Playwright CI/CD: Complete Guide to Running Tests in Pipelines in 2026
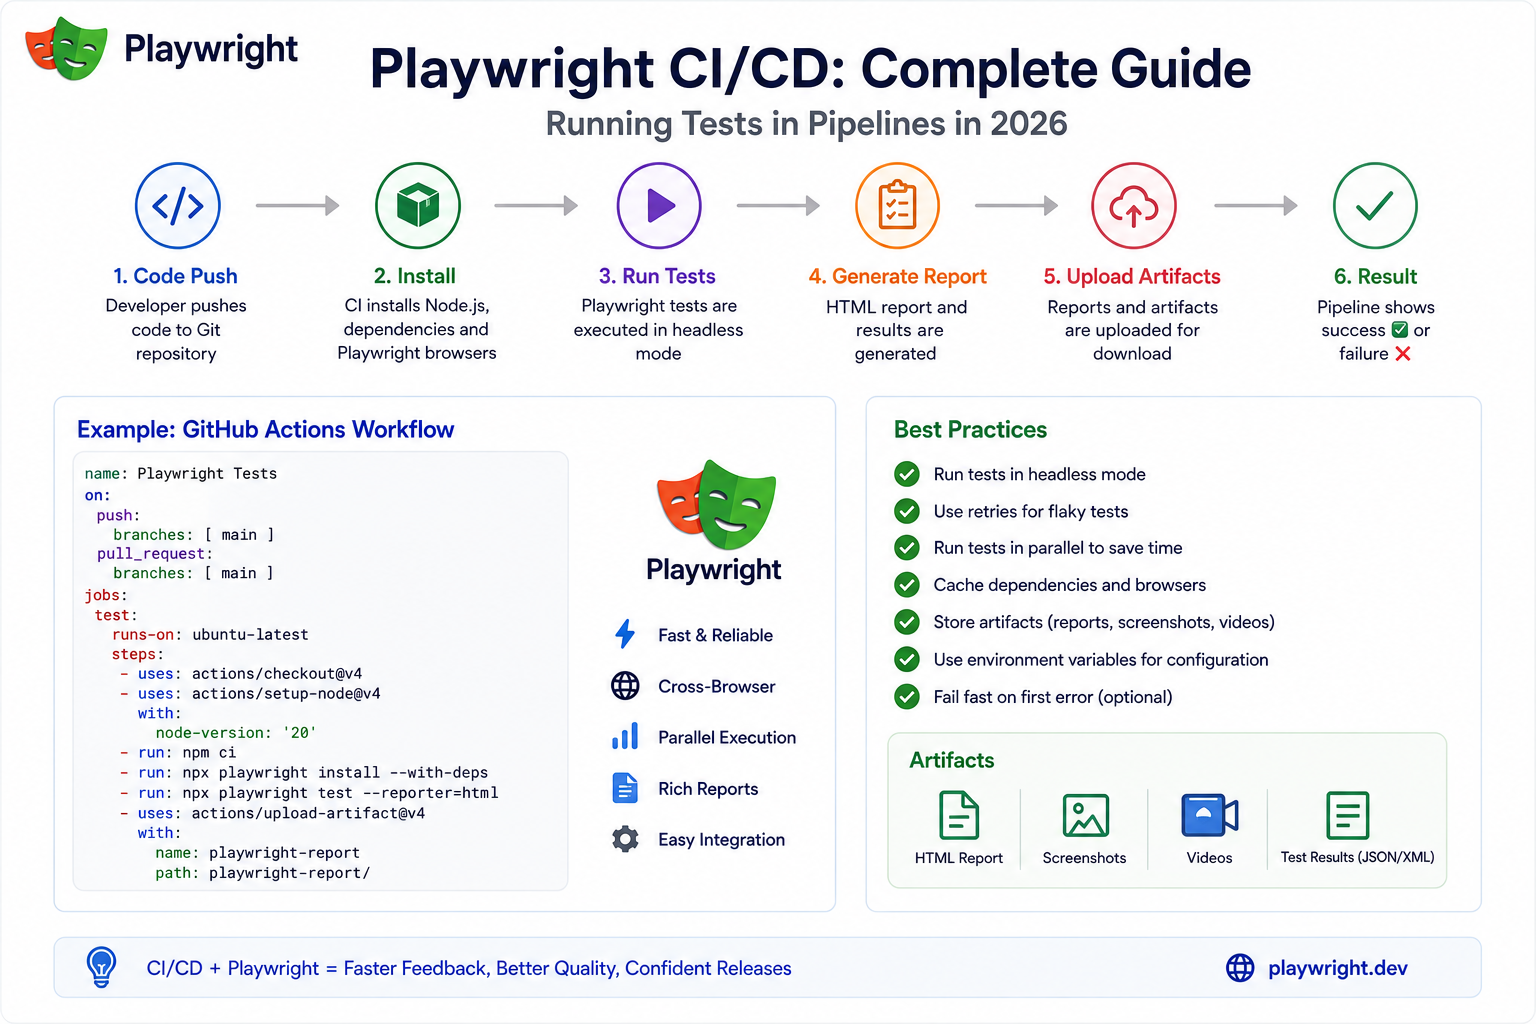
This guide covers everything you need to integrate Playwright into your CI/CD pipeline in 2026 — GitHub Actions, GitLab CI, Docker, parallel execution, caching, sharding, and the practices that separate a fast and reliable pipeline from a slow and flaky one.
Why CI/CD Integration Matters for Playwright
Running tests only on your local machine is not enough. CI/CD integration means:
- Every pull request is tested automatically before merging
- Tests run on a clean, consistent environment — not just your machine
- Failures are caught early when they are cheapest to fix
- The whole team gets notified of regressions immediately
- Test results and reports are stored and accessible to everyone
Running Playwright in Headless Mode
In a CI environment there is no graphical display. Playwright handles this automatically — it runs in headless mode by default, meaning browsers run without a visible window.
You do not need to configure anything for headless mode. When you run npx playwright test in a CI environment Playwright detects the environment and runs headlessly without any additional flags.
If you ever need to force headless mode explicitly you can set headless: true in your playwright.config.ts or pass --headed=false as a command flag.
Setting Up GitHub Actions
GitHub Actions is the most widely used CI/CD platform for open source and private repositories in 2026. Setting up Playwright in GitHub Actions requires a workflow file in your repository.
Basic GitHub Actions Workflow
Create a file at .github/workflows/playwright.yml in your repository. A basic workflow does the following:
- Triggers on every push to main and every pull request
- Checks out your repository code
- Sets up Node.js
- Installs your project dependencies with
npm ci - Installs Playwright browsers with
npx playwright install --with-deps - Runs your tests with
npx playwright test - Uploads the test report as an artifact so you can download and inspect it
--with-deps flag installs the system dependencies that Playwright's browsers need on Linux — this is required in CI environments and is different from a local installation.Storing Test Reports as Artifacts
After tests run you want to be able to see the results — especially when tests fail. GitHub Actions lets you upload files as artifacts that are stored for a configurable number of days.
Upload the playwright-report/ folder as an artifact after every run. Use if: always() to ensure the artifact is uploaded even when tests fail — which is exactly when you need the report most.
Running Tests Only on Specific Branches
You can configure the workflow to run only on specific branches or only when specific files change. For example run the full Playwright suite only on pull requests to main and run a faster smoke test suite on feature branches.
Setting Up GitLab CI
GitLab CI uses a .gitlab-ci.yml file in your repository root. The structure is similar to GitHub Actions but with GitLab-specific syntax.
A GitLab CI pipeline for Playwright defines a test stage, uses a Node.js Docker image, installs dependencies and browsers, runs tests, and saves the report as a GitLab artifact with an expiry time.
GitLab artifacts support a reports key that integrates test results directly into merge request pages — showing pass/fail status without needing to download a separate report file.
Using Docker for Consistent Environments
Docker is the most reliable way to ensure your Playwright tests run in exactly the same environment in CI as they do locally — and as they did last month.
The Official Playwright Docker Image
Microsoft publishes an official Docker image for Playwright — mcr.microsoft.com/playwright — that comes with all browsers and their system dependencies pre-installed. Using this image eliminates the browser installation step entirely, making your pipeline faster and more reliable.
Reference the image in your GitHub Actions workflow using the container key, or use it directly in your Dockerfile for custom builds.
The official image is versioned to match specific Playwright releases — always pin to the same version as your @playwright/test package to avoid browser/driver mismatches.
Custom Dockerfile
For more control, build a custom Docker image that installs your project dependencies and browsers during the image build phase. Then use that image in CI — the browsers are already installed and tests start immediately without any installation delay.
This is particularly useful for large teams where many CI runs happen per day and the browser installation time is a significant cost.
Parallel Execution and Sharding
Running all your tests sequentially in a single CI job is slow. Playwright supports two approaches to parallelism — workers within a single job and sharding across multiple jobs.
Workers Within a Single Job
Playwright runs multiple tests in parallel within a single process using workers. Set the number of workers in your playwright.config.ts with the workers option.
In CI environments it is common to set workers based on the number of available CPU cores. A reasonable default for most CI runners is 2 to 4 workers. Setting too many workers on a resource-constrained CI runner can cause instability and flakiness.
Sharding Across Multiple Jobs
Sharding splits your test suite across multiple CI jobs running in parallel. If you have 200 tests and shard across 4 jobs, each job runs approximately 50 tests simultaneously. The total wall-clock time drops to roughly a quarter.
Enable sharding by passing --shard=1/4, --shard=2/4, --shard=3/4, and --shard=4/4 to separate CI jobs. Each job runs its assigned slice of the test suite independently.
After all shards complete, merge the results into a single report using npx playwright merge-reports.
In GitHub Actions, use a matrix strategy to define the shard jobs — one matrix entry per shard. All shards run in parallel and a final job merges the reports.
Choosing Between Workers and Sharding
Use workers for moderate test suites where one CI runner has enough resources to run tests in parallel. Use sharding when your test suite is large enough that even parallel workers on one machine are too slow, or when you want to distribute across multiple machines for maximum speed.
Many teams use both — multiple workers per shard job for maximum parallelism.
Caching Dependencies and Browsers
Installing Node.js dependencies and Playwright browsers on every CI run is slow. Caching speeds up your pipeline significantly.
Caching node_modules
Cache the node_modules folder based on your package-lock.json hash. When the lockfile has not changed the cache hit restores dependencies instantly without running npm ci.
GitHub Actions provides a cache action for this. GitLab CI uses a cache key with paths and policy settings.
Caching Playwright Browsers
Playwright browsers are stored in a cache directory — typically ~/.cache/ms-playwright on Linux. Cache this directory based on the Playwright version.
When the Playwright version in your lockfile has not changed the browsers are restored from cache. When you upgrade Playwright the cache miss triggers a fresh browser download matching the new version.
Combining dependency caching and browser caching can reduce pipeline setup time from 2 to 3 minutes down to under 30 seconds on cache hits.
Environment Variables and Secrets
Most applications need environment-specific configuration — base URLs, API keys, database connection strings. CI/CD platforms provide secure ways to store and inject these.
GitHub Actions Secrets
Store sensitive values in GitHub repository secrets under Settings → Secrets and Variables → Actions. Reference them in your workflow using the secrets context. They are injected as environment variables available to your test process.
Set your base URL, API credentials, and any other environment-specific values this way rather than hardcoding them in your config file.
Environment-Specific Configuration
Use environment variables in your playwright.config.ts to set the base URL and other values dynamically. This lets the same config file work correctly in local development, staging, and production CI pipelines — just by changing the environment variables.
Retries in CI
Flaky tests are a reality in any test suite. Playwright's retry mechanism re-runs failing tests a specified number of times before marking them as failed.
Configure retries specifically for CI using the retries option in playwright.config.ts. A common pattern is zero retries locally — so failures are visible immediately — and two retries in CI to absorb genuine flakiness without false failures.
process.env.CI ? 2 : 0 checks whether the CI environment variable is set and adjusts retries accordingly. GitHub Actions, GitLab CI, and most other platforms set CI=true automatically.
Test Reports in CI
HTML Report
Playwright's HTML report is the most detailed — it shows every test, its status, duration, steps, screenshots, and traces. Generate it by setting reporter: 'html' in your config or passing --reporter=html on the command line.
Upload the report folder as a CI artifact and download it when you need to investigate failures.
JUnit XML Report
Many CI platforms — including GitHub Actions, GitLab CI, Jenkins, and CircleCI — can parse JUnit XML format and display test results natively in their interfaces. Generate it with reporter: 'junit' and point your CI platform to the output file.
Multiple Reporters
You can configure multiple reporters simultaneously — for example HTML for detailed investigation and JUnit for CI platform integration. Pass an array of reporter configurations in playwright.config.ts.
Traces and Screenshots on Failure
Playwright can capture a full trace of every failing test — including DOM snapshots, network requests, console logs, and screenshots at every step. This is invaluable for debugging CI failures you cannot reproduce locally.
Configure traces in your playwright.config.ts with trace: 'on-first-retry' — this captures a trace on the first retry of any failing test without the overhead of tracing every test.
Upload the test-results/ folder as a CI artifact. Traces are stored there and can be opened with npx playwright show-trace trace.zip or uploaded to the Playwright Trace Viewer web interface.
Notifications
Connect your CI pipeline to Slack, email, or your team's communication tool to get notified when tests fail. Most CI platforms support webhook notifications natively.
A practical pattern is to notify only on failures to main or release branches — not on every feature branch run — to avoid notification fatigue.
Common CI/CD Issues and Fixes
Browser installation failing — use npx playwright install --with-deps instead of npx playwright install. The --with-deps flag installs system dependencies required on Linux CI runners.
Tests passing locally but failing in CI — the most common cause is timing. Add retries: 2 in CI. Check whether the CI runner is slower than your local machine and increase timeouts if needed. Also check for hardcoded local URLs or paths.
Out of memory errors — reduce the number of workers. CI runners typically have less memory than development machines. Start with workers: 2 and increase only if the runner can handle it.
Slow pipelines — implement dependency and browser caching. Enable sharding for large test suites. Consider running a fast smoke test suite on every commit and the full suite only on pull requests to main.
Flaky tests in CI — add retries, check for race conditions in tests that depend on timing, and investigate tests that use page.waitForTimeout() — replace these with proper web-first assertions that retry automatically.
Playwright CI/CD Best Practices
Always use npm ci instead of npm install in CI. npm ci installs exactly what is in the lockfile, is faster, and fails if the lockfile is out of sync with package.json.
Cache aggressively. Cache both node_modules and the Playwright browser cache directory. The time savings on every run add up significantly.
Use the official Playwright Docker image. It eliminates browser installation issues and ensures a consistent environment across all runners.
Set retries to 2 in CI and 0 locally. This absorbs genuine flakiness in CI without hiding failures during local development.
Upload artifacts on failure. HTML reports, traces, and screenshots are only useful if they are accessible after the job ends. Always upload them as artifacts.
Shard large suites. If your suite takes more than 10 minutes, sharding across 4 or more parallel jobs brings it under control.
Run smoke tests on every commit, full suite on pull requests. A fast subset of critical tests gives rapid feedback on every push. The full suite runs where it matters — before code merges.
GitHub Actions vs GitLab CI for Playwright
| Feature | GitHub Actions | GitLab CI |
|---|---|---|
| Setup complexity | Low | Low |
| Matrix sharding | Native matrix strategy | Parallel keyword |
| Artifact storage | 90 days default | Configurable expiry |
| Free tier | 2,000 minutes/month | 400 minutes/month |
| Docker support | Yes | Yes — native |
| Test result integration | Via JUnit artifact | Native JUnit support |
| Self-hosted runners | Yes | Yes |
Frequently Asked Questions
Does Playwright need a display server in CI?
No. Playwright runs in headless mode by default which requires no graphical display. On Linux CI runners you do not need to install Xvfb or any display server. If you use the official Playwright Docker image all dependencies are already included.
How do I install Playwright browsers in CI?
Run npx playwright install --with-deps in your CI workflow after installing Node.js dependencies. The --with-deps flag installs both the browser binaries and the system libraries they depend on. Without --with-deps browsers may fail to launch on Linux CI runners.
How many workers should I use in CI?
Start with 2 workers and increase if your runner has more CPU cores and memory available. Most standard GitHub Actions runners have 2 cores so 2 workers is the practical maximum. For larger runners with 4 or 8 cores you can increase accordingly. Setting more workers than available cores typically makes tests slower not faster.
How do I view test traces from CI?
Download the test-results/ artifact from your CI run. Open the trace file with npx playwright show-trace path/to/trace.zip. Alternatively upload the trace file to trace.playwright.dev in your browser to view it without installing anything locally.
How do I run Playwright tests only when relevant files change?
In GitHub Actions use the paths filter in your workflow trigger. Specify the folders that contain your application code and test files. When only documentation or configuration files change the workflow is skipped automatically — saving CI minutes.
Can I run Playwright tests against a staging environment in CI?
Yes. Set the BASEURL environment variable in your CI configuration to point to your staging environment. Reference it in playwright.config.ts as baseURL: process.env.BASEURL. This lets the same test suite run against local, staging, and production environments by changing one environment variable.
Justin is a self-taught developer who builds and runs DeelCart himself — from the articles to the server it runs on. He manages his own Linux infrastructure and writes guides based on tools and workflows he actually uses day to day.